Tuesday, January 1, 2030

About This Blog

This is a blog about the game Lines of Action, an abstract strategy game invented by Claude Soucie and published in Sid Sackson's A Gamut of Games in 1969. This blog is a response to the 100 Play Challenge set up by Nick Bentley on Board Game Geek, and most of the entries will be records and analysis of the games that I play as part of this challenge. But there might be analysis of other LOA games, random observations, guest posts, etc.

There are hundreds abstract of strategy games out there, but unfortunately very few with extensive literature (strategy guides, game records, blogs etc.) about them. Chess, Checkers, Go, Shogi and Xiang-qi come to mind. Other abstracts have maybe 1 or 2 guides in print, e.g. Hex, Othello, Hive, Arimaa etc. This blog is intended to expand the knowledge of LOA, and hopefully encourage others to write about their favorite, lesser known abstracts.

The graphics on this site will either be photos of my "set" (using a chess board and Gipf pieces) or pictures of the Lines of Action app, created by Pool Night Studios. My thanks to Pool Night for letting me uses their graphics.

Most of these games will be played with human opponents, either online or in person. I will play 16 games with the Pool Night app (4 games on each of 4 levels).

The game records will use long algebraic notation (e.g. 1.c8-c6 a2-c2 2. d8-b6 a6-c4)

If anyone wants to help me with this challenge, I play and boardspace.net and iggamecenter.com under the user name bebopj. Also, any comments on how to improve this blog are welcome.

Lines of Action Rules

Lines of Action is played with a checkers set. The black checkers go on the top and bottom rows, minus the corners. The red checkers go on the left and right columns, minus the corners. Black goes first. (Note: on some websites, the colors are black & white or red & white. In these cases white always goes 2nd.)
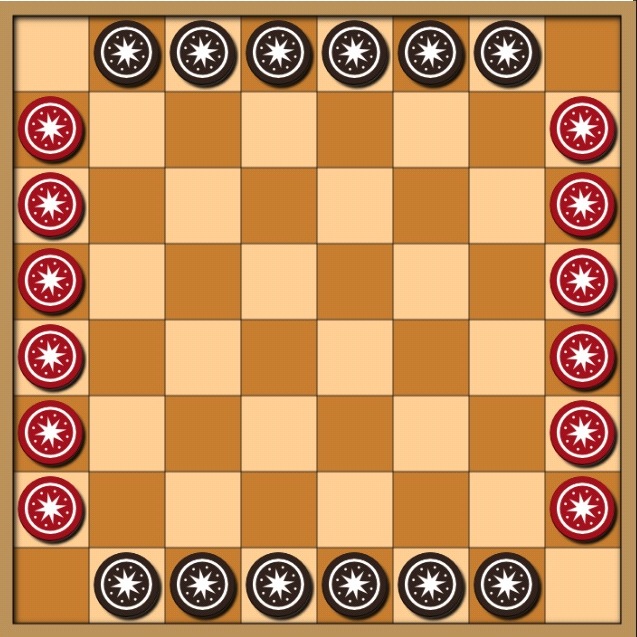
Opening position

Pieces can move in any orthogonal or diagonal direction, but they can only move the exact number of spaces as there are pieces (both yours and your opponents) in the particular row, column or diagonal. So if there are 3 pieces in row 4, any of those piece can move 3 squares within that row.

You may jump over your own pieces, but you cannot jump over your opponent's pieces. You can land on your opponent's pieces to capture them, but you can't land on your own pieces.


In the above position, red's piece on c5 can move 3 spaces to f5 or 2 spaces to either a7 or e3. All other moves are illegal.

If a player cannot make a move, they must pass. Some people play that if a player cannot make a move, it's a draw. A three fold repetition is a draw.

The object of the game is to connect all of your pieces, orthogonally and/or diagonally on the board.

Winning position for black

Originally, a move which resulted in a winning position for both sides was considered a draw. Claude Soucie later changed this rule so that the player making the move wins the game.

If you make a move that results in a winning position for your opponent, then they win the game.

Friday, September 21, 2018

Game 17 Richard Malaschitz vs. me 1/23/16 Little Golem


The theme of this game is the Knight's Move. Well, that and how I missed a mate in one twice in a row.

1. g1-e3 h6xe3

The same first move as last game...

2. d8-b6

...however, black counterattacks this time.

...h2-f2

While e3xb6 would have worked, this move limits the options on black's pieces at e1 and f1, while maintaining an attack on b6.

3. b1-b4 a2-c2
4. b8-b5


An attempt at a wall. Better to prepare b8-b5 with f6-e5 first.

...f2xb6
5. c8-c5 c2xc5
6. e8-e5 h4-e4
7. f1-c4 h6-e6

The e6 piece is now a knight's move away from the piece on c5, which allows for connections on d5 and d6. In fact there are 2 more knight's moves, 1 for red (e4 and c5) and one for black )c4 and e5). It's obvious that the d4, d5 and d6 squares are going to be very important from here on out.

During my first run through of this game, I thought that red's piece at e6 could be attacked by the move g8-g7 or d1-b3 followed by g8-g7, but red can save it in both situations (one by capturing d4 with it.)

8. d1-b3 h7-f5
9. f8-d8 h5-g4
10. e5-d4

...g4-d7??

a6-d6#!

11.d4xd7 e3-e7???

a6-d6, ya moron!!

12. d7-d5 a6-d6

Finally!

Tuesday, September 18, 2018

Game 16 As vs. me 1/12/16 Little Golem


Black unfortunately gave away too many pieces in the opening. While it means less piece to connect, black's position was ruined. 

1. g1-e3 h6xe3
If c1xe3, h3xe3

2. f1-d3 h4-f4
3. d1-d4 a4xd4
4. e1-c3 a5xc3
5. b1-e4

...h5-g4

A mistake on my part. h7xe4 would have begun an isolation of the d3 pieces.

6. e4xh7

With this move, I assume that my opponent is trying for a connection on the north side of the board.

...a2-c2
7. d3-g6

This move confirms my suspicions, and in fact my last move helped black out. Still, it's going to be tough to move the c1 piece up the board.

...a7-a4
8. h7-e4

Blocking the move a4-e4.
 ...a3-c5

9. g6-d3

I originally had a question mark for this move, but now I see I had a mate in 1 that black was trying to stop.

 ...a6-c4
10. e8-c6 a4xc6#


Tuesday, September 11, 2018

Game 15 - Me vs Dragon Jr 1/12/16 Goldtoken

1. c8-c6 a7-c5

In other openings, this would be a gift, but I moved the only piece that could safely capture it.

2. b8-b6 a3-d6
3. e8-e6

I don't know what the hell my strategy was in this game. It seems like I was just developing my northern pieces without regards to the position.

...h5-e5
4. f8-f6 h4-f4
5. g8-d5

Two tenuous connections.

...h3-g3
6. f1xf4 a2xd5
7. d1xd5 a6-b5
8. c1-c4?

This allows the next move. While I recapture, I separate a stone that was previously connected.

...h6xf4
9. f6xf4 h7-f5

10. e1-e4?

I should have been looking for a way to attack red's pieces at c5, d6 or e5.

...g3-g5
11. g1-g3?

11. g1-e1 would have lost to ...h2-h3, 12. e1xe5 h3xe6

...h2-h3
12. Resigns

I couldn't parry both h3-h4 and h3xe6.

Sunday, September 2, 2018

Game 14 - Clark94 vs me 1/5/16 Super Duper Games

Another game where the d4 square is key.

1. d1-b3 a4-c4

When someone tries to block my position in the opening, I immediately try to escape. This move prevents my a4 piece from being blocked in by black's b1-b4. However, this is a blunder.

2. b8-b5 a5-c3

Another escape move, almost as bad as the last.

3. c8xc4 h5-f7
4. b1-b4

e1xc3 would establish a base and put my piece at a3 in a difficult position. (...a3-c5 4. c3xc5 or ...a3xc1 4. g1xc1)

5. c1-e3

...a3-b2

With this move, red initiates a fight for the control of d4

6. g1-d4 h4xd4
7. f1-d1 a7-d7
8. e8-e5 a6-c6
9. d8-e7 c6-d5
10. b5xd7 h6-f4
11. d7-f5 d5-d2?

This allows black to connect over the top with f5-d5 and I have no immediate counter-attack.

12. d1-e2

Black decides to occupy the e file instead.

...h2xe5
13. e7-f6 h3xf5

14. f6-g6?

Allows the winning move. The game would have continued with e1xe5.

...c2xg6

Saturday, May 14, 2016

Game 13 - Patu2004 vs me 3/21/15 mindoku - 5 minute game


Very little commentary this game, as I got the feeling that Patu2004 was a beginner.

1. f1-d3 a3xd3 
2. g1-e3 h3xe3

2 gifts in a row. The paradox is that while it reduces the amount of pieces you have to connect, it allows your opponent to establish a base.

3. c1-c3 a4-c4
4. e8-e5 h7-e4 
5. d8-d5 h6-f4 
6. f8-f6 h2-f2 
7. c8-c5 f2-f5


8. g8-g7

He had the move g8xc4 for a few turns now, which would have broken my connection.

…h4-d4 

Putting a final touch on separating the 2 sides of the board.

9. b8-b6 a2xd5


Now I separate East and West

10. d1-f3 a7-a4 
11. c5-b4

Trying to keep my central pieces separated from my western ones.

…a6-a3


Crawling down the board to connect.

12. f6-g5 a4-b3 
13. e1-f2 h5xf3 
14. g7-h6 d3-b5

In games where your opponent tries to centralize, it's important to look for squares you can counter-attack. g8xc4 might have made for a better game for black.

Tuesday, February 17, 2015

Game 12 - Me vs. Mortenand 12/5/14 on iggamecenter.com


A little light on the opening commentary, as halfway through the game, Mortenand admitted “I don’t know what I’m doing.” I figure it was his/her first game.

1.c8-c6 a7-c5
2 c1-c4 h7-f5
3. g1-g3 h2-f2
4. g8-d5


Starting to create a base.

…a2-c2
5. b1-b3 h4-e4
6. e1xe4 a5-c7
7. d1-d4


Base is a little stronger

…a3-d6

A good move, connecting the c5 & c7 pieces and allowing potential connectivity with the eastern pieces. It also prevents 8. f8xc5 and 8. g3-d6

8. b3-b5 a6-b7

Trying to isolate the b8 piece.

9. b8-a7 a4-a6
10. e8-e6 f2-f6?


Allows the next move. h3xe6 or c2-d1 are options, but even better is c7-f4, preventing the winning move of the game. At this point, red should be trying to establish a base in the east, especially on the f file.

11. f1xf5 f6xd4

A good effort, but black has a devastating next move. This position reminds me of a standard ko shape in Go. Is this a balanced position for both sides, or is one side more fragile than the other? this might depend on the counterattacking abilities of the pieces towards the edge of the board.

12. g3xd6! b7xb5

Another good effort, but it allows black to connect his isolated a7 piece, with at least 5 checkmate threats. 

13. a7xc7 b5-b4

14. d8-e7#

Sunday, January 18, 2015

Game 11 - Me vs Hyxxy - 11/8/14 on iggamecenter.com

This game, amazingly, was pretty much over by move 7. I went over it 4 times, still trying to figure out what the hell went wrong.

1. c8-c6 h7-f7
2. g8-g6 a4-c2
3. b1- b3

My last 2 moves were escape moves, while hyxxy keeps the initiative. I am not sure how much of an advantage these moves are; might have been better to sacrifice a piece.

…a6-c4

4. b3-b5

A tough situation. I’m trying to avoid f7xb3, and I thought this was the best way to do it at the time. For:

4. b3-b1 simply retreats
4. b3-e3 loses to 4…h6xb3
4. d1-f3 (anticipating 4….f7xb3 5. f3xb3) loses to 4…h5xf3
4. c6-d5 a5xd5 5. d8xd5 might lead to an advantage for black.

…h2-e2
5. g6-d6 a2-d2
6. f8-c5 h6-e3


At this point, it was essential to play 7. e1=g3/ It limits the mobility of the pieces at h3 and h4, prevents a3-d3 and prepares d6xd2, in that red can't recapture with a5xd2.

7. d8-d4?

Sets up red’s next move.

…a7-a4!

Preparing h4xd4. capturing the essential d4 square. 8. e8xa4 would not change red's next move.

8. f1-f3 h4xd4!

Devastating! My pieces are firmly separated, while hyxxy has a firm base. d4 was the key square in this game. I should now be looking for options of connecting down the f-file, as I cannot capture any of hyxxy’s pieces on the 2nd, 3rd and 4th ranks.

9. c6-e4


...a4xe4

My position is ruined. It’s all downhill from here.

10. d1-h1 f7-d5
11. e8-g6 h5xc5
12. g1-h2 a3xd6
13. e1-f2 a5-c3
14. f2-g3 h3-g4
15. f3-f4 g4-f5#

Interesting how in these last 2 games, there was a square that was key for both sides to connect. Also interesting that they were both central squares, I keep wondering if this was a foxed win for red, and if so, at what move did that manifest itself. 


Hyxxy is either a grandmaster or a bot.

Game 10 - Erik Dresner vs. Me - 9/7/14 1st NYC Abstract Strategy Meetup


This the first face to face game I’ve blogged, from the first NYC Abstract Strategy Meetup in NYC:

NYC Abstract Strategy Meetup

1. b8-b6 a2-c2
2. g8-f7 a3-c3
3 g1-d4


Red cannot take this piece because of the response d1xd4. This move also prepares d8-d5, centralizing another piece, but only if the a4 piece moves.

…a5-c5

My strategy, apparently, was to create a wall down the c-file, admittedly a weak one.

4. f1-d3

A gift! Although I still can’t play a4xd4.

…h7xd3
5. c1-e3

Preventing h3-e3 which creates a slightly stronger wall on the 3rd rank.

…a6-c4

Wall is looking a little stronger now.

6. f7-d5?

While it gets a piece into the game, it is now safe to play h4xd4, strengthening the wall and creating a large base. A better move might be b1-a2 preparing f7xc4.

…h4xd4
7. e8-c6

e4 is shaping up to be the key square. Black needs to play c6-e4 soon.

…a7-a5
8. f8-d6 h6-f4

Prepares a4-e4. But red, like black, doesn’t recognize the importance of e4.

9. c8-e6 h2-e5
10. e1xe5 h3-f5
11. d1-e1

…a4-e4
Finally!

12. d8-e8 h5-g4
13. e3-c1 g4-b4#

Interesting that e4 was a square that both of us needed to connect our separated groups. Could this have led to a more messy battle earlier in the game? A concept worth exploring.

Saturday, June 14, 2014

Game 9 - LOA Titaan vs me 1/26/14 on Mindoku.com. 5 minute game

Sorry it's been a while, but I've been busy and no one's been accepting my requests on iggamecenter and Mindoku.

1. b1-b3 a2-c2
2. g1-g3 h2-f2
3. g8-g6 a6-d6
4. f8-f5 h7-f7
5. e8-e6

Titaan could have captured my opening gift with g6xd6 instead, but that would reduce the mobility of the piece on f7.

...a5-d5
6. d1xd5 a7-c5
7. d8-f6

Building an impressive wall on the eastern half of the board. Now for a series of captures, as I try to break Titaan's wall and he tries to strengthen it.

...c2xf5
8. c8xc5 h5xd5
9. g3xd6 h4xf6
10. b8-b6 h3xe6

Isolating the g6 piece.

11. c1-e3 e6xe3
12. b3xe3 a3-b2
13. b6xf2

Black is abandoning his previous base of operations, and is trying to connect on another part of the board, due to the isolated g6 piece.

...a4-b3

Threatening b3-e6, but then realized e3xe6. I decided to save the move until the end.

14. g6-g5 b2-d4
15. g5-d2 h6-g7

Threatens b3-e6#

16. c5-c4

Blocks and gets this stone closer to connecting.

...g7-e7

17. d6xf6

...e7-e4??

Allows f6xd4#!

18. f1-d3?

Fortunately for me, Titaan missed it. Did I mention this was a 5 minute game?

...f7-g7

19. f6-e6?

e1xe4 threatening f2xf5 might be better.

...g7-e5
20. f2-f4

e6-f6 or e1-c3 keeps black in the game.

...e5-c3#

A typical blitz game: Lots of errors on both sides due to time trouble. Titaan's strategy of relocating the area of connecting is one I never saw before or considered, but it worked very well in this game. Another aspect of LOA that deserves exploring.